
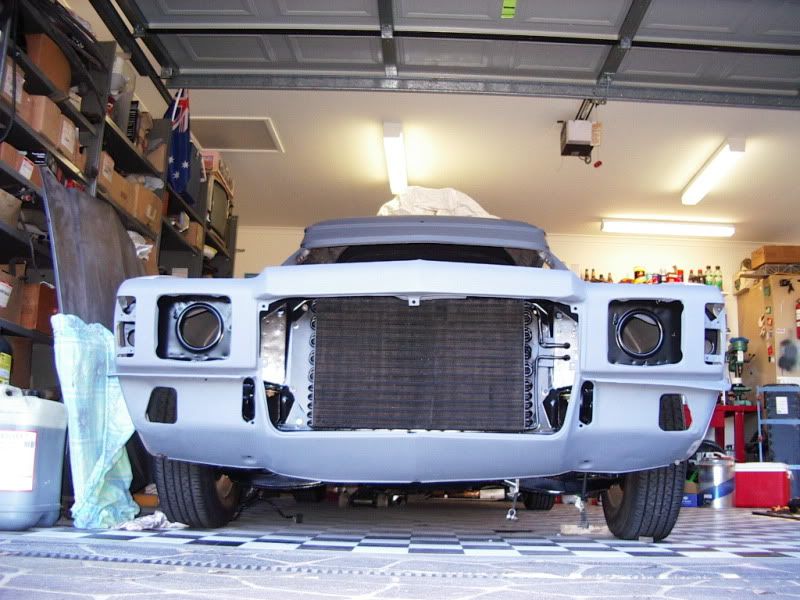
A bit more progress on our yellow van, now the engine bay is painted and ready for Rodney to put in the air/con and duct work...followed by a motor in a couple of weeks...


A bit more progress on our yellow van, now the engine bay is painted and ready for Rodney to put in the air/con and duct work...followed by a motor in a couple of weeks...

Shiny! Looks great, nothing like a new coat to make it look fresh and new.
Jennie what model is this van, HX or HZ?
Was the suspension and bushes etc redone or were they good enough to keep?
HZ 77 about the first of almost the changeover for HX to HZ has a chrome glovebox and key Barrel where as the Red van is late HZ and has blackOriginally Posted by Blocker

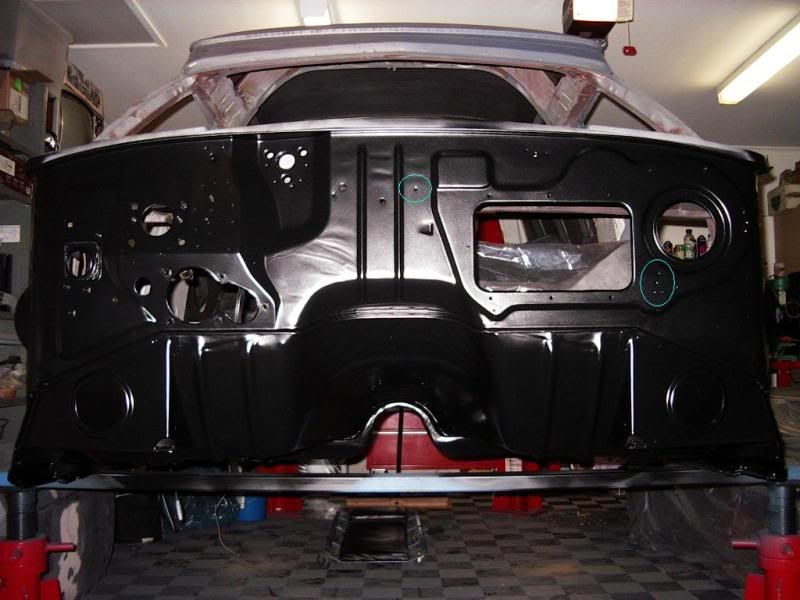
Are you putting factory A/C in? If so Rodney should have cut all the holes required for painting. There is a 32mm hole in the middle and another 3 x 16mm ones for the pipes.

Ah yes. correct. If you want a pic of where to put them let me know and I will happy snap my HZ GTS shell. With orginal holes etc.
Owner (Jason) - STICKTHIS Automotive Decals and Stripes
HX Sandman Panelvan. Mint Julep. Complete Factory Resto.
HZ Sandman Ute. Saddle Tan Metallic - Customised. Galaxy Blue.
HZ GTS. Palais White. Next Resto From 99% NOS Parts.
HSV GTO Coupe - Highly Modified
VR SS into a VS Supercar Castrol Perkins Ingall 1997 Tribuilte build
Yes please pic would be good he is putting it on tomorrow, we can cut the hole and then touch up the paint....so much to learn....
If you look closely you will see small factory dimples where the holes have to go. I'll see if I have a pic of my firewall. There are 3 below the big hole for the fan motor and another for the wiring just to the left of the plastic heater box housing. There are also 2 dimples on the radiator support panel, left hand side, where you have to drill for the condensor pipes. They come through the left hand radiator support mounting bracket.
--- Updated ---
Found it....
I've put a blue circle around the dimples. You will notice the one on the right, near the fan hole, has 3 dimples. Thats because you need to drill 3 holes, obviously. Two are for the heater pipes and the third (middle hole) is so the rubber grommet will fit in between the pipes....if you know what I mean.
Last edited by GTS; 08-10-2010 at 09:20 AM.
This is from memory, the bigger hole is 32mm, and the other 3 x smaller - I used 5/8" from memory. Just check against another car first. I think last time I did it I dressed up the 3 x 16mm holes into 1 x slot as the holes actually overlap and look messy.
As another point of interest, see the dimple on the firewall photo directly above the RH edge (passenger's side edge) of the steering column hole? It is on the bit that slope backwards at about 45degrees. That is the dimple for a TH400 or TH350 speedo cable entry if anyone ever needs to know! I think it is also 32mm. The other hole to the driver's side of the column hole just gets a blank speedo cable grommet in it.
Jennie, have you got the l/h engine mount for air con?
Yes thanks,
Rodney has already welding up and ground, the 32mm hole which had been cut in for the speedo cable when the Turbo 400 was fitted to the vehicle, he was aware of the 32mm hole for the wiring and vacuum hoses, and new he needed to cut holes for the heater pipes, didn't realize that they were an oval hole, just thought they would be two individual holes. thanks for all your input and advice, always valued.. (from Rodney)
He wasn't actually aware it was 32mm but thought it was around that size and was going to measure hole off rubber gromit..
Last edited by jennie285; 08-10-2010 at 10:25 AM. Reason: Add more waffle
There are currently 1 users browsing this thread. (0 members and 1 guests)
 Posting Permissions


 Reply With Quote
Bookmarks